PRE-1995 Talon BOV
May 14, 2002
The BOV lets excess air vent out of the intercooler lines
when you lift the throttle. This keeps your turbo spooled up between shifts, and
takes some stress off your turbo's bearings. The stock Chrysler BOV is good to
15 psi. The early Talon BOV's are good to 20 psi. With an easy mod, they're good
way beyond 21 psi.
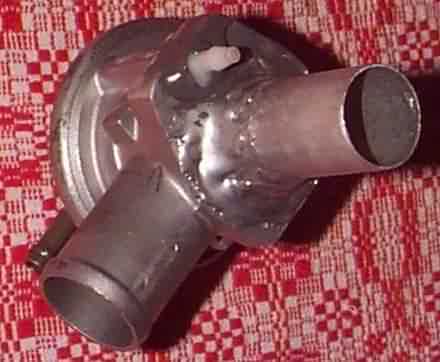
The BOV was cut, and a
tube epoxied on . The little hole next to the large hole gets it's own little
vacuum line barb epoxied on.
This
little hole helps the valve to lift QUICKLY by sending boost under
the diaphragm to help blow it off the seat.
Get your intercooler tubing ready for the BOV by mounting
a small metal tube with epoxy, as shown below...
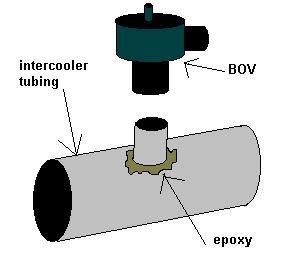
Also epoxy a small vacuum line barb (not shown above) to
the intercooler tubing for sending boost to the little hole in the Talon valve's
bottom.
However, with the line sending
boost to this little hole, the valve lifts off of it's seat by itself
at about 20 psi. If you want to go over 20 psi, you have to disconnect the little
line while at the track, and let the little hole see normal atmosphere. Now the
valve will be slower to lift, but it'll stay seated at any pressure. Then plug
it back in, and go home.

Just unplug
the little line whenever you want to go over 20 psi. If you put yours on with
the stock mounting flange, stay under 20 psi, or you'll leak out boost and
overspin the turbo. Gary Donovan's site has a page about doing the same trick,
but using the stock flange instead of the "new" home-made tube.
Want to
unplug and replug the little line automatically?
Follow this simple
diagram with a common 3 nipple solenoid:

Wire the
ground through the same toggle switch that you use to switch onto high boost. If
you don't have a toggle switch for high-low boost levels, then supply the ground
through a pressure switch set at 20 psi, and it'll go into the "leak-less" mode
automatically as the boost goes past 20 psi.
The epoxy could easily be ground
very smooth and professional-looking. I left mine rough on purpose. I want
everything under my hood to look "homemade", because it is home
made. I love it when people look under the hood and think "Look at all this
home made crap! How can it go so fast?"
That makes my day. If
you're a neat freak, you could do it up in a smooth, neat way. You could stick fake braided stainless over the black rubber
tube... You could paint the BOV to be color coordinated with your
engine...
Below is a diagram and photo of Slug's current set up to
show the placement that I chose; feel free to choose your own, but try not to
create long runs of vacuum tubing; the shorter the better.
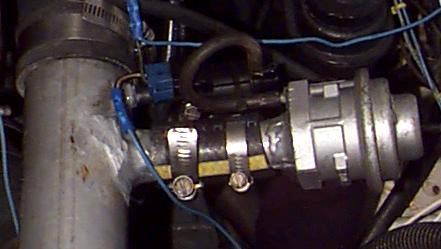
Note that the upper blue wire which feeds the
solenoid also branches off out of the top of the picture. That's because it
also feeds the "high-low" solenoid. Whenever you flip the toggle switch
on my dash for high boost (27.5 psi) it automatically sets the valve to
high pressure use. You can use any type of switch that you desire; rpm switch,
pressure switch, nitrous switch, or manual switch. as soon as the switch is on
"low" again, the valve functions as stock; good for up to 20 psi.
If you stay
with a cheaper plastic valve you can take some stress off of the BOV by
using this diagram to send vacuum/boost to the valve:
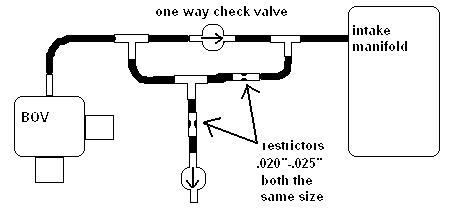
With this set up, your stock BOV will no longer
leak at 15 psi; it'll be good for over 20 psi. This will shorten it's life,
however. You might get 3 months to a year out of it before the plastic
ruptures.
HOME